Deploying a Node.js application on Windows IIS using a reverse proxy
16 September 2020
Categories: Windows Server, IIS
Posted in: Node.js, IIS, Windows Server, Reverse Proxy
Goals
- Install Node.js on Windows
- Deploy a Node.js application on IIS with a reverse proxy
- Launch a Node.js application as a Windows service
Deploying a Node.js application on Windows IIS using a reverse proxy
Running a Node.js application on Windows Server is not hard, but there's no real documentation on the internet so I've written this article to explain how I do it by setting us a windows service that runs my Node.js app and exposing the app to IIS via a reverse proxy.
We will perform the following actions (the order matters):
- Install Node.js on Windows Server
- Deploy and test the Node.js application
- Create a website on IIS for our Node.js application
- Configure the reverse proxy on IIS
- Create a Windows Service to run our Node.js application automatically
Step 1: Install Node.js on Windows Server
Ok this one is the simplest step of the process: go to https://nodejs.org/en/download/ , download Node.js for Windows (e.g. Windows Installer .msi 64-bit) and install it on your server.
Once the setup process is done, verify that Node.js is available: run a command prompt (Windows Key + R, type 'cmd' and press Enter), when the command window appears type: node.js -v
If Node.js installed correctly, you will see the Node.js version installed:
node.js -v
v.12.18.3
Step 2: Deploy and test the Node.js application
This is also a simple step: copy your Node.js application files to a folder on your Windows server (e.g. "C:\websites\myNodeSite").
You should now be able to test your application. My app is a Node.js program based on Express and running on port 5057, so I will Open a command prompt and type: node C:\websites\myNodeSite\bin\www
Node.js will run the application:
node C:\websites\myNodeSite\bin\www
2020-09-05T16:20:54.085Z [info] Listening on port 3806
Now you can open your browser and navigate to: http://localhost:5057 (my Express app is set to run on port 5057)
If the app has no errors you will see the home page.
Step 3: Create a website on IIS for our Node.js application
Follow the instruction on my article IIS: How to setup a web site to create a new website on IIS: this is where you will tell IIS which folder to use as a website and you'll configure the bindings, to ensure your domain name maps to the website.
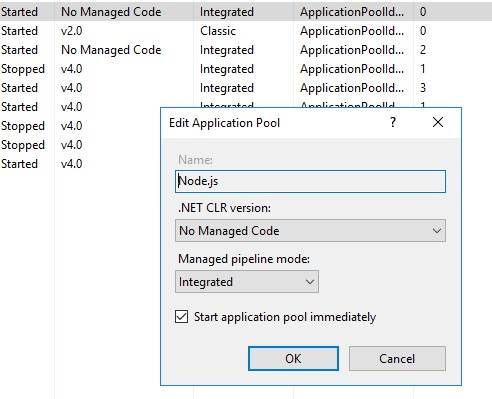
Find your site's application pool and ensure it's not set to run .NET
Step 4: Configure the reverse proxy on IIS
Before we can use our website, nee need to configure the reverse proxy to ensure IIS will point to our Node.js application.
Open your app's folder in Windows Eplorer and create a new file called web.config (or edit the existing one if IIS created it for you) then add a new rewrite rule for your website, as follows:
<configuration>
    <system.webServer>
        <rewrite>
            <rules>
                <rule name="ReverseProxyInboundRule1" stopProcessing="true">
                    <match url="(.*)" />
                    <action type="Rewrite" url="http://localhost:5057/{R:1}" />
                </rule>
            </rules>
        </rewrite>
    </system.webServer>
</configuration>
This rule will tell IIS to stop processing all request and forward them to your Node.js website at http://localhost:5057
You can of course add any number of rules to the web.config file. I usually add at least the following rules:
- Lower Case Rule: forces IIS to serve all URLs in lower case.
- Canonical Host Name Rule: forces IIS to always use your canonical URL
- Remove Trailing Slash Rule: forces IIS to remove trailing slash characters when serving URLs
- SSL Rule: forces IIS to serve all URLs over SSL
If you want to apply these additional rules please read my article Useful settings and rewrite rules for your website on IIS.
When you are done adding rewrite rules save your web.config file, open a browser window and navigate to http://my-node-js-website.com to ensure the reverse proxy is working correctly: you will now see your website online.
Step 5: Create a Windows Service to run our Node.js application automatically
As a final step, we need to create a Windows service to ensure our Node.js website is always running and automatically restarted if it ever crashes.
There are many tool that allow you to create a service on Windows, I will show you how to do that with a free tool called NSSM (Non-Sucking Service Manager) that you can download from the official website at nssm.cc
This tool allows you create a windows service that will run your node.js application. In essence, it will run command node C:\websites\myNodeSite\bin\www when Windows starts, effectively launching your Node.js application.
After downloading the executable nssm.exe, create a batch file somewhere on your Server and call it something meaningful to you, (e.g. my-node-js-site.bat). This file will have to be present on your server at all times so choose a place where it won't be deleted by mistake. This batch file has a single line of contents:
node C:\websites\myNodeSite\bin\wwwNow that the batch file is ready, run the NSSM tool from an elevated command prompt. NSSM has many settings that you can use from the command line, but The simplest way is to run nssm.exe install to launch the UI of the tool.

Set the path to the batch file we just created: for example, C:\websites\my-node-js-site.bat
Set the service name (the name that will appear in the Windows services list). For example, mynodejssite
Click the Details tab, set a description for your service (e.g. Service for My Node.js Website). You must also ensure the startup type is set to Automatic. This will ensure that your website is started automaticall when Windows starts.

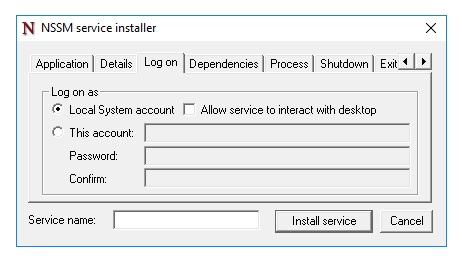
Click the Log on tab and ensure that the logon type is Local System Account. This is needed to ensure that your app runs at all times, even when there's no desktop user connected to the server.
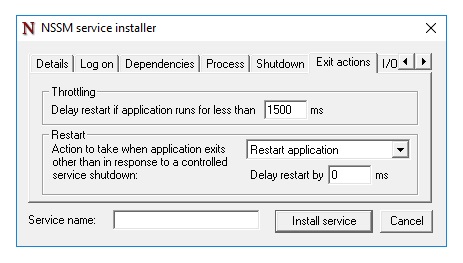
Click the Exit actions tab and ensure that the restart option is set to Restart application. This will ensure that your application is restarted if it ever crashes.
Click the button Install Service and NSSM will create the new Windows service for you.
To make sure the service was created succesfully open Computer Management on your server then go to Applications/Services on the left pane. On the right pane you will see the list of all services installed on your server.
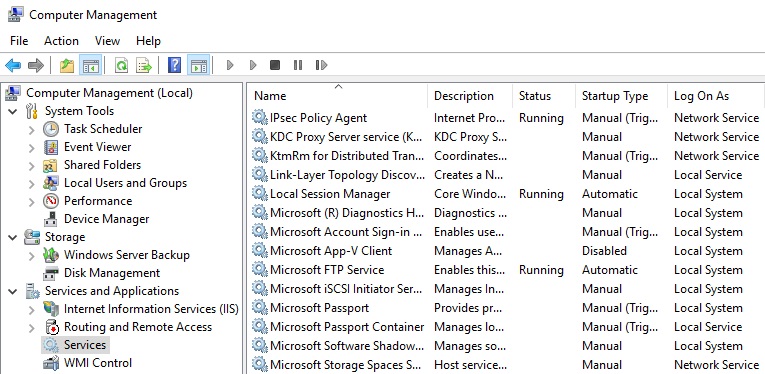
Locate your service mynodejssite and ensure that:
- the server status is
Running - the server startup type is
Automatic - the server logs on as a
Local Service
Double click your service and on the details window click the Recovery tab.
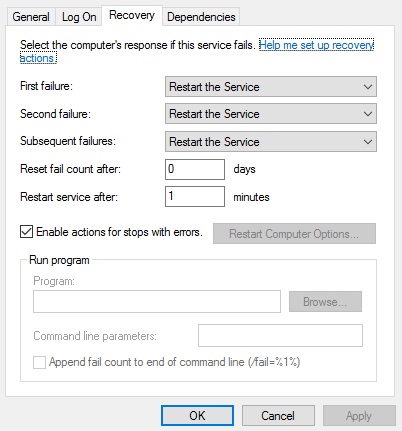
Make sure that:
- First failure is set to
Restart the Service - Second failure is set to
Restart the Service - Subsequent failure is set to
Restart the Service
Note: if you need to unistall the service, you can do so by running nssm.exe remove mynodejssite from an elevated command prompt.
Conclusion
It is indeed possible to run Node.js applications and web services on Windows Server, this article showed you a way to do so with IIS and a reverse proxy.
Hope this helps ;)